網路上的雲端硬碟服務其實蠻多的從Amazon、Asus 、Google、 Microsoft、Dropbox等雲端服務商比比皆是,往往我們可使用服務商所提供的工具來達到cloud異地同步 & 異地備份的效果,這時就需要Rclone來玩轉各個網路服務
像Google就會提供專屬的Google Drive Tool給用戶使用
這樣或許是最快速也最方便的方法
但如果你同時間使用多家的雲端的服務商
每家都安裝他們專屬的客戶端程式
就會覺得有點麻煩
另外大部分的服務商提供的Client大部份都是用來Cloud sync
有時候也許使用者只想簡單的把網盤掛載成一個本機額外的硬碟
這時我們就可以運用Rclone來實現這個方案
最近透過朋友介紹,開始使用rclone來整合這些服務
分別在CenntOS7及Debian8、Ubuntu16.04還有Windows7、10 實作
透過rclone config及mount,把電腦 or Server上的本機資料夾變成網盤資料夾
以下簡單介紹相關環境的安裝 & 應用
=============================================================
①安裝Rclone
Centos 7
1 2 3 4 5 6 7 8 9 | yum update yum install epel-release yum install curl unzip screen fuse fuse-devel curl -O https://downloads.rclone.org/rclone-current-linux-amd64.zip unzip rclone-current-linux-amd64.zip cd rclone-*-linux-amd64 sudo cp rclone /usr/bin/ sudo chown root:root /usr/bin/rclone sudo chmod 755 /usr/bin/rclone |
Debian 8 & Ubuntu 16.04
1 2 3 4 5 6 7 8 | apt-get update apt-get install screen screen unzip fuse curl -O https://downloads.rclone.org/rclone-current-linux-amd64.zip unzip rclone-current-linux-amd64.zip cd rclone-*-linux-amd64 sudo cp rclone /usr/bin/ sudo chown root:root /usr/bin/rclone sudo chmod 755 /usr/bin/rclone |
Windows 7 & 10
.先到官方下載 rcline windows版本應用程式
下載完後解壓縮,把解壓縮的rclone資料夾放到你想指定的硬碟位置
建議放置在c:\以外的地方以免權限問題
本範例我放置在d槽,所以路徑為 d:\rclone-v1.41-windows-amd64
.安裝執行rclone所需要的環境庫 winfsp,可到官網下載
下載完winfsp直接執行安裝一直next到安裝完成
②rclone config設定
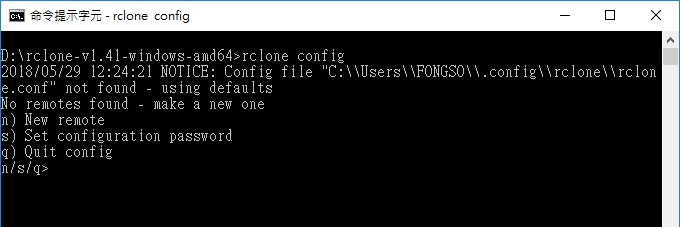
若以上安裝皆正確,輸入以下指令
1 | rclone config |
會顯示如下圖示
接著我們就可以在rclone config mode設定相關的參數
以下範例分二部份,分別為Google Drive & Onedrive 設定
第一部份:Centos7環境當範例,掛載我的Google Drive團隊盤到Server本機資料夾
1 2 3 4 5 6 7 8 9 10 11 12 13 14 15 16 17 18 19 20 21 22 23 24 25 26 27 28 29 30 31 32 33 34 35 36 37 38 39 40 41 42 43 44 45 46 47 48 49 50 51 52 53 54 55 56 57 58 59 60 61 62 63 64 65 66 67 68 69 70 71 72 73 74 75 76 77 78 79 80 81 82 83 84 85 86 87 88 89 90 91 92 93 94 95 96 97 98 99 100 101 102 103 104 105 106 107 108 109 110 111 112 113 114 115 116 117 118 119 120 121 122 123 124 125 126 127 128 129 130 131 132 133 134 135 136 137 138 | No remotes found - make a new one n) New remote s) Set configuration password q) Quit config n/s/q> n ## 現在要建立一個新的設定檔,所以選擇 n ## name > gd ## 為你想掛載的網盤取個名字,例如 gd ## Type of storage to configure. Choose a number from below, or type in your own value 1 / Alias for a existing remote \ "alias" 2 / Amazon Drive \ "amazon cloud drive" 3 / Amazon S3 Compliant Storage Providers (AWS, Ceph, Dreamhost, IBM COS, Minio) \ "s3" 4 / Backblaze B2 \ "b2" 5 / Box \ "box" 6 / Cache a remote \ "cache" 7 / Dropbox \ "dropbox" 8 / Encrypt/Decrypt a remote \ "crypt" 9 / FTP Connection \ "ftp" 10 / Google Cloud Storage (this is not Google Drive) \ "google cloud storage" 11 / Google Drive \ "drive" 12 / Hubic \ "hubic" 13 / Local Disk \ "local" 14 / Mega \ "mega" 15 / Microsoft Azure Blob Storage \ "azureblob" 16 / Microsoft OneDrive \ "onedrive" 17 / Openstack Swift (Rackspace Cloud Files, Memset Memstore, OVH) \ "swift" 18 / Pcloud \ "pcloud" 19 / QingCloud Object Storage \ "qingstor" 20 / SSH/SFTP Connection \ "sftp" 21 / Webdav \ "webdav" 22 / Yandex Disk \ "yandex" 23 / http Connection \ "http" Storage> 11 ## 我們現在想要掛載Google Drive 所以選擇 11 ## Google Application Client Id - leave blank normally. client_id> ## client_id 請保留空白直接enter ## Google Application Client Secret - leave blank normally. client_secret> ## client_secret 這邊也保留空白直接enter ## Scope that rclone should use when requesting access from drive. Choose a number from below, or type in your own value 1 / Full access all files, excluding Application Data Folder. \ "drive" 2 / Read-only access to file metadata and file contents. \ "drive.readonly" / Access to files created by rclone only. 3 | These are visible in the drive website. | File authorization is revoked when the user deauthorizes the app. \ "drive.file" / Allows read and write access to the Application Data folder. 4 | This is not visible in the drive website. \ "drive.appfolder" / Allows read-only access to file metadata but 5 | does not allow any access to read or download file content. \ "drive.metadata.readonly" scope> 1 ## 這邊選擇 1 ,取得完整的權限 ## ID of the root folder - leave blank normally. Fill in to access "Computers" folders. (see docs). root_folder_id> ## 這邊請保留空白直接enter ## Service Account Credentials JSON file path - leave blank normally. Needed only if you want use SA instead of interactive login. service_account_file> ## 這邊請保留空白直接enter ## Remote config Use auto config? * Say Y if not sure * Say N if you are working on a remote or headless machine or Y didn't work y) Yes n) No y/n> n ## 不使用auto config,所以輸入小寫的 n ## If your browser doesn't open automatically go to the following link: https://accounts.google.com/o/oauth2/auth?access_type=offline&client_id=xxxxxxxxxxxx.apps.googleusercontent.com&redirect_uri=urn%3Aietf%3Awg%3Aoauth%3A2.0%3Aoob&response_type=code&scope=https%3A%2F%2Fwww.googleapis.com%2Fauth%2Fdrive&state=ooooxxxxxxooooxxxxxe4 Log in and authorize rclone for access Enter verification code> ## 在上步驟會跳出https://開頭的網址,請複製網址透過瀏覽器開啟,並輸入你的google帳號給予授權後,網頁會提供一組code,請輸入在此處 ## Configure this as a team drive? y) Yes n) No y/n> y ## 上步驟如code輸入正確,會詢問您是否掛載模式為團隊盤,如果想掛載的是團隊盤輸入y,僅個人網盤使用請輸入n ## Fetching team drive list... Choose a number from below, or type in your own value 1 / design \ "0AHKb_xxxxxxxxxxxxxxxx" Enter a Team Drive ID> 1 ## 以上步驟我選擇掛載團隊盤,這邊會顯示出你的團隊盤列表,列表中我的團隊盤編號為1,因此此處輸入1 ## [gd] type = drive client_id = client_secret = scope = drive root_folder_id = service_account_file = token = {"access_token":"oooooxxxxxxooooooxxxxxooooxxxxx"} team_drive = 0AHKb_xxxxxxxxxxxxxx -------------------- y) Yes this is OK e) Edit this remote d) Delete this remote y/e/d> y ## 系統會詢問這個設定是正確的嗎? 正確請輸入 y ## Name Type ==== ==== gd drive e) Edit existing remote n) New remote d) Delete remote r) Rename remote c) Copy remote s) Set configuration password q) Quit config e/n/d/r/c/s/q> q ## 最後請輸入 q 離開config mode,到此rclone已設定完成 ## |
透過以上步驟,設定已完成,接著要mount網盤到我們的本機資料夾
在任意地方建立一個本機資料夾gd (以下範例為在/root 下建立一個gd資料夾)
1 | mkdir -p /root/gd |
透過 screen 背景執行 rclone 把團隊盤gd 掛載到本機/root/gd 資料夾下
因為前面設定name>時取名為gd,所以在指令行mount後面接 gd:
1 | /usr/bin/screen -d -m -S rcmount /usr/bin/rclone mount gd: /root/gd --allow-other --allow-non-empty --vfs-cache-mode writes |
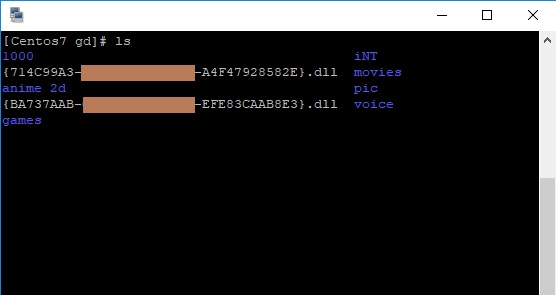
若成功掛載,輸入
1 | ls |
可看到原本建立的空資料夾已經多了掛載的團隊盤資料
如何卸載
如後續不想使用了,想卸載已掛載的Google Drive網盤
重新開機就會自動卸載
也可以輸入以下指令手動卸載
1 | fusermount -qzu /root/gd ## 請輸入之前掛載網盤的路徑,例如之前我是掛載在/root/gd ## |
開機自啟動 (請自行選擇要透過systemd還是rc.local來達到開機自啟動)
systemd service (以本篇教學範例為主,請自行更改成自己環境運行的路徑)
1 2 3 4 5 6 7 8 9 10 11 12 13 14 15 | vi /etc/systemd/system/rcmount.service ## 請輸入以下內容 ## [Unit] Description=rcmount After=network.target [Service] User=root Type=forking ExecStart=/usr/bin/screen -d -m -S rcmount /usr/bin/rclone mount gd: /root/gd --allow-other --allow-non-empty --vfs-cache-mode writes ExecStop=ExecStop=/usr/bin/screen -S rcmount -X quit [Install] WantedBy=multi-user.target |
接著輸入
1 2 3 | systemctl daemon-reload systemctl enable rcmount.service systemctl start rcmount.service |
rc.local
1 2 3 4 5 | vi /etc/rc.local ### 空白處加入以下內容 ### sudo fusermount -qzu /root/gd /usr/bin/screen -d -m -S rcmount /usr/bin/rclone mount gd: /root/gd --allow-other --allow-non-empty --vfs-cache-mode writes |
第二部分:以下教學以 Windwos 10 64bit 為範例,掛載Onedriver到Windows本機資料夾
開啟windows的cmd
由之前安裝步驟得知rclone的路徑為 d:\rclone-v1.41-windows-amd64
1 2 3 4 5 6 7 8 9 10 11 12 13 14 15 16 17 18 19 20 21 22 23 24 25 26 27 28 29 30 31 32 33 34 35 36 37 38 39 40 41 42 43 44 45 46 47 48 49 50 51 52 53 54 55 56 57 58 59 60 61 62 63 64 65 66 67 68 69 70 71 72 73 74 75 76 77 78 79 80 81 82 83 84 85 86 87 88 89 90 91 92 93 94 95 96 97 98 99 100 101 102 103 104 105 106 107 108 109 110 111 112 113 114 115 | No remotes found - make a new one n) New remote s) Set configuration password q) Quit config n/s/q> n ## 現在要建立一個新的設定檔,所以選擇 n ## name > od ## 為你想掛載的網盤取個名字,例如 od ## Type of storage to configure. Choose a number from below, or type in your own value 1 / Alias for a existing remote \ "alias" 2 / Amazon Drive \ "amazon cloud drive" 3 / Amazon S3 Compliant Storage Providers (AWS, Ceph, Dreamhost, IBM COS, Minio) \ "s3" 4 / Backblaze B2 \ "b2" 5 / Box \ "box" 6 / Cache a remote \ "cache" 7 / Dropbox \ "dropbox" 8 / Encrypt/Decrypt a remote \ "crypt" 9 / FTP Connection \ "ftp" 10 / Google Cloud Storage (this is not Google Drive) \ "google cloud storage" 11 / Google Drive \ "drive" 12 / Hubic \ "hubic" 13 / Local Disk \ "local" 14 / Mega \ "mega" 15 / Microsoft Azure Blob Storage \ "azureblob" 16 / Microsoft OneDrive \ "onedrive" 17 / Openstack Swift (Rackspace Cloud Files, Memset Memstore, OVH) \ "swift" 18 / Pcloud \ "pcloud" 19 / QingCloud Object Storage \ "qingstor" 20 / SSH/SFTP Connection \ "sftp" 21 / Webdav \ "webdav" 22 / Yandex Disk \ "yandex" 23 / http Connection \ "http" Storage> 16 ## 我們現在想要掛載OneDrive 所以選擇 16 ## Microsoft App Client Id - leave blank normally. client_id> ## client_id 請保留空白直接enter ## Microsoft App Client Secret - leave blank normally. client_secret> ## client_secret 這邊也保留空白直接enter ## Choose OneDrive account type? * Say b for a OneDrive business account * Say p for a personal OneDrive account b) Business p) Personal b/p> p ## 商業使用請選 b ,個人使用請選擇 p ## Use auto config? * Say Y if not sure * Say N if you are working on a remote or headless machine y) Yes n) No y/n> y ## 目前在win環境運行,可透過win本機瀏覽器開啟http 所以選擇 y 如果當下在Server環境下運行,因沒有額外安裝桌面程式無法透過Server本機瀏覽 網頁,這時就必須選擇 N (大寫的N),利用遠端機器來取得授權,也就是當Server 無法授權時,那我們可以透過win環境下來remote取得授權碼,再將code貼到Server端 即可完成Onedrive的授權 溫馨提醒:在cmd複製code時請注意不可有斷行 例:{"access_token":"oooooooooooooooooxx xxxxxxxxxxxxxxxoooo ooooooooooooooooo"} 請修改成{"access_token":"oooooooooooooooooxxxxxxxxxxxxxxxxxooooooooooooooooooooo"} ## Got code -------------------- [od] type = onedrive client_id = client_secret = token = {"access_token":"oooooooooooooooooxxxxxxxxxxxxxxxxxooooooooooooooooooooo"} -------------------- y) Yes this is OK e) Edit this remote d) Delete this remote y/e/d> y ## 這邊輸入 y 確認設定正確 ## Current remotes: Name Type ==== ==== od onedrive e) Edit existing remote n) New remote d) Delete remote r) Rename remote c) Copy remote s) Set configuration password q) Quit config e/n/d/r/c/s/q> q ## 到此步驟已完成設定,選擇 q 離開config mode ## |
透過以上步驟,設定已完成,接著要mount網盤到我們的windows本機資料夾
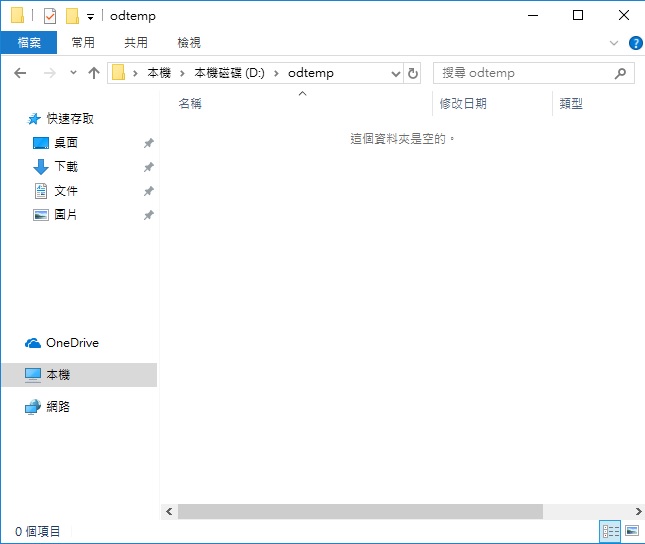
在任意地方建立一個od緩存cache資料夾 (以下範例為在d:\下建立一個odtemp資料夾)
接著輸入以下指令,掛載Onedive到本機資料夾
x: 為在win系統中建立一個虛擬硬碟當onedrive掛載的目地,可依喜好自行修改
d:\odtemp 此資料夾為剛建立用來緩存onedrive資料傳輸時的暫存資料夾
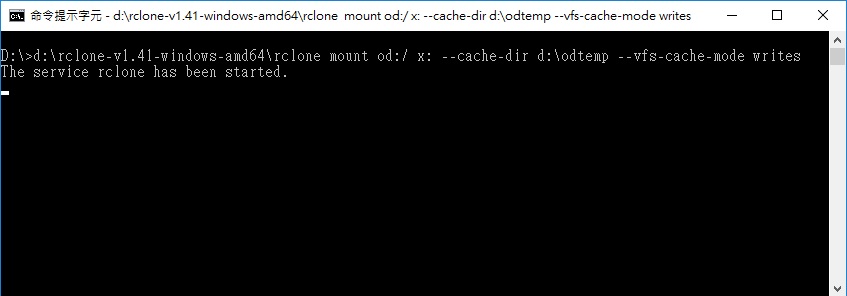
1 | d:\rclone-v1.41-windows-amd64\rclone mount od:/ x: --cache-dir d:\odtemp --vfs-cache-mode writes --allow-other --allow-non-empty |
成功的會看到如下圖示訊息 (視窗可縮小化,請勿關閉)
系統會多了一個x槽出來,並成功顯示onedrive網盤的內容可供存取
如何卸載
在windows卸載超級簡單,關掉cmd視窗,就自動卸載了
開機自啟動
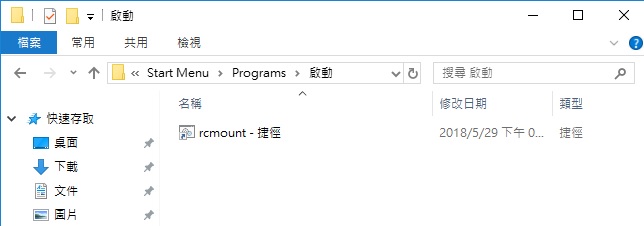
透過記事本把上述指令另存成 rcmount.bat 然後建立一個rcmount.bat的捷徑
若覺得每次掛載都要輸入指令麻煩,也可執行rcmount.bat即可自動掛載
若要開機自啟動,把建立的捷徑放入Windows Start Menu資料夾
Win7 Start Menu
%USERPROFILE%\AppData\Roaming\Microsoft\Windows\Start Menu\Programs\Startup
Win10 Start Menu
%ProgramData%\Microsoft\Windows\Start Menu\Programs\Startup
③Rclone 指令集
請參考 官方指令集說明
最常用的指令一般為rclone copy or rclone sync
因應用廣泛,請自行官方說明這邊不多加述敘
1 2 3 4 | rclone copy -v --stats 10s /root/gd/iNT/ /home/iNT ## 以上範例為把之前掛載的gd團隊盤資料夾裡面iNT資料夾 複製到本機的 /home/ 下 參數 -v 會顯示當下複制內容 --stats 10s 為每10秒顯示完整進度 ## |
在 Linux OS環境下
雖然也可以使用一些像cp的本機指令,但還是建議學會透過rclone指令來操作
有不少參數設定可以讓掛載的Cloud Service更具體化
例如使用cp複制時,只會覆蓋原本已有的資料
使用rclone copy時,就會檢查本機 or 遠端已存在什麼資料
只會複制現階段本機 or 遠端缺少的資料
一般rcmount並不佔用本機硬碟的使用空間,除非sync同步或是把遠端cloud data copy到本機
但也不建議在使用pt時,直接輔種掛載的團隊硬盤,這樣非常容易出錯,而且並不會節省到任何本機硬碟空間
因為系統還是會下載遠端資料夾到資料到本機來補種,這點需特別注意




c:\rc>C:\rc\rclone mount od:/ x: –cache-dir e:\odtemp –vfs-cache-mode writes –
-allow-other –allow-non-empty
2023/07/22 11:16:27 NOTICE: –allow-non-empty flag does nothing on Windows
2023/07/22 11:16:27 NOTICE: –allow-other flag does nothing on Windows
The service rclone has been started.
—
您好,看起來有成功,但是我的電腦沒有出現x槽耶,是windows 7不能用嗎?
我用
C:\rc\rclone mount od:/ x: –cache-dir e:\odtemp –vfs-cache-mode writes
這個指令成功了,感謝您
你好,抱歉現在才回覆,一陣子沒來Blog了
如果是Win7使用Google Drive的話,我推薦使用RaiDrive這個軟體
在Win7上跑的比掛載Rclone還順,Win10以後的版本就沒什麼差異了
請問 rclone 掛載雲端硬碟真的不會佔用空間嗎?
很怕 windows 被偷吃一堆資源卻找不到地方刪除
是的 不會佔用任何空間
博主 macOS怎么挂载?
抱歉
目前手边没有masOS的机器
所以我也不知该怎么挂载
下面是官方的教学,你可以试试
macOS installation from precompiled binary
Download the latest version of rclone.
Unzip the download and cd to the extracted folder.
Move rclone to your $PATH. You will be prompted for your password.
(the mkdir command is safe to run, even if the directory already exists).
Remove the leftover files.
Run rclone config to setup. See rclone config docs for more details.
Install from source
Make sure you have at least Go 1.7 installed. Download go if necessary. The latest release is recommended. Then
You can also build and install rclone in the GOPATH (which defaults to ~/go) with:
and this will build the binary in $GOPATH/bin (~/go/bin/rclone by default) after downloading the source to $GOPATH/src/github.com/ncw/rclone (~/go/src/github.com/ncw/rclone by default).
Installation with Ansible
This can be done with Stefan Weichinger’s ansible role.
Instructions
git clone https://github.com/stefangweichinger/ansible-rclone.git into your local roles-directory
add the role to the hosts you want rclone installed to:
博主写的非常棒(๑•̀ㅂ•́)و✧!
正在按照您的教程操作中,谢谢!!
不用客气, 有任何问题都可留言:)